Table of Contents
Usage Instructions
First Time Setup
Please ensure you have a working 4-16GB micro SD card inserted which is formatted to FAT32; larger capacities are not recommended and may be unsupported. The Wardriver will not boot without a micro SD card inserted. You should also connect antennas to your wardriver before attempting the setup.
When you first boot your Wardriver after flashing, it should create a WiFi network which you can connect to using a smartphone or WiFi-enabled PC. The network name and password are both wardriver.uk by default.
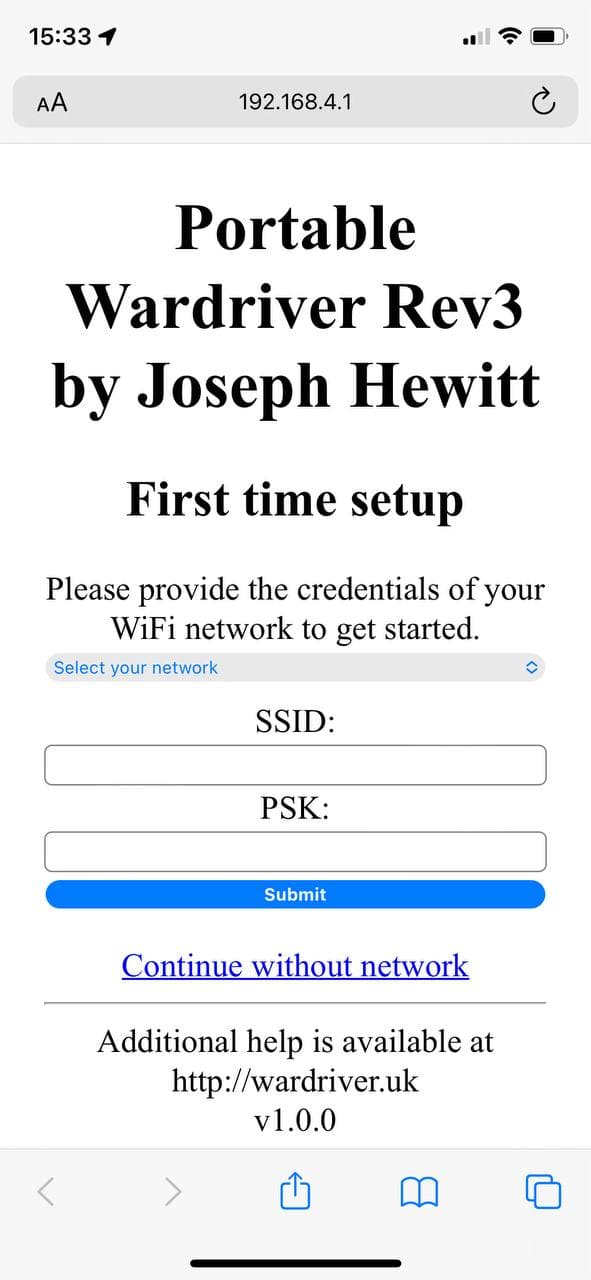
Upon connecting, please visit http://192.168.4.1/ in a web browser. You should see the following page:
This page allows you to provide credentials for an existing WiFi network. On boot, your wardriver will connect to this network and allow users to download files via a web interface. This is only recommended for private networks such as your home network.
Your wardriver will also attempt to perform NTP time syncs using this network; this allows your device to have accurate time/date information almost immediately after being powered on. Accurate dates and times are essential for Wigle.net so this is helpful if you regularly power up your wardriver in an area with weak GPS.
Use the “Continue without network” link if you would prefer to not use this feature.
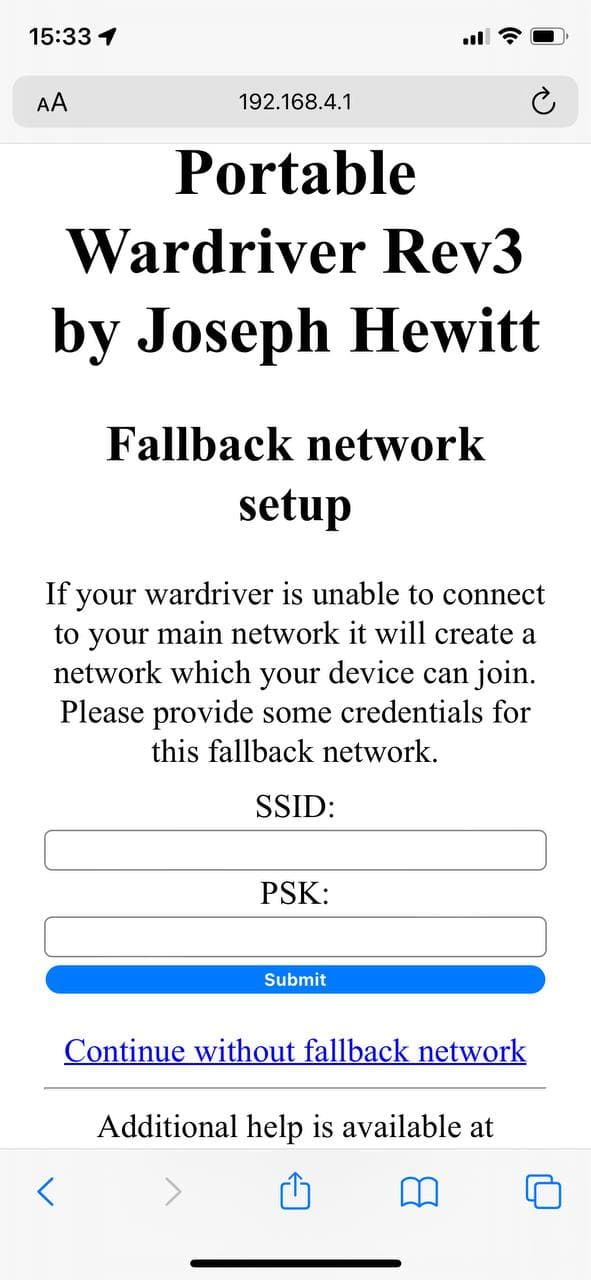
The following page should look like this:
This page allows you to configure a fallback network which your wardriver will create if the main network is unavailable or not configured. You can connect to this network using your smartphone or WiFi-enabled PC in order to download the data from your wardriver. By connecting to this network and visiting the web interface, the time of your device will be synced to the wardriver in order to provide accurate time information.
It is highly recommended to have a fallback network configured. If your wardriver does not have the ability to join/create a network, you will be unable to download data from the device wirelessly and must remove the SD card and insert it into a PC. Also, your wardriver will be unable to quickly sync the current time and must rely only on GPS which can be slow, this means some collected data will be unacceptable for Wigle.
Accessing Data
When your wardriver first boots, it will connect to your configured network or create a WiFi access point which you can connect to. In order to download data, you need to be on the same network as the wardriver and must visit the IP address of the device in a web browser. The wardriver IP address should be displayed on the LCD.
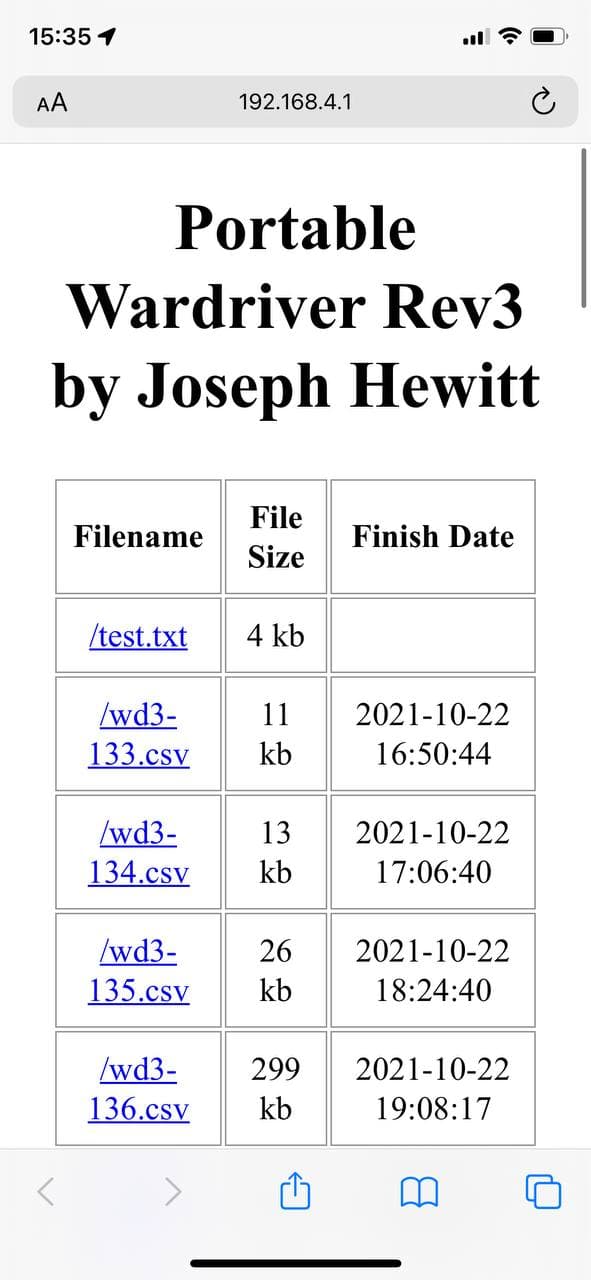
The web interface should look like this:
If any data has been collected, it should be displayed in the table. Each item in the table refers to a single wardriving session and each session begins/ends when you add/remove power to the wardriver. The table should contain 3 columns; filename, file size, and finish date. The filename is a clickable link which will initiate a download to your device when you click it. The file size is the approximate size of the file in kilobytes and the finish date is the most recent timestamp which the file contains (eg, it is generally the time when your wardriver stopped collecting data for that session).
A file called “test.txt” is usually present, this file is written to on each boot to test if the SD card is accessible. It contains a very basic log of the state of each boot.
Uploading Data
The data which your wardriver generates can be uploaded directly to Wigle.net. To upload data to Wigle, follow these steps:
You may wish to register or login to Wigle before uploading files - this will allow you keep long-term statistics about the data you have collected.
- Visit Wigle.net and press the “Uploads” button in the top toolbar.
- Press the yellow “UPLOAD A FILE” button.
- Press the “Browse” button near the bottom left of the popup.
- Choose the file which you downloaded from your Wardriver (A CSV file in this format: ID_wd3-NUM.csv)
- Press “Send” at the bottom right of the popup.
Collecting Data
To start collecting data, provide power to your wardriver. Initially your wardriver will attempt to connect to any configured WiFi networks or host a fallback network. If you do not interact with the web interface for around 1 minute, your wardriver will continue to boot as normal.
Once the startup has completed, your wardriver will begin to collect data with no further interaction from you. The LCD should display some basic statistics about your current wardriving session.
Here is an example of what may be displayed on your wardriver LCD:
WiFi:21 Temp:32.12c
HDOP:12 Sats:8N
BLE:15 GSM:3
2022-03-06 13:08:27
The first line contains the number of WiFi networks in range along with the internal wardriver temperature (provided by the optional DS18B20 sensor).
The second line contains the GPS horizontal dilution of precision (HDOP) value in tenths which is an approximate indicator to how accurate your location is. Lower numbers here are better, anything below 10 is excellent. The “Sats” part of the line informs you of how many satellites are being used for position; higher is generally better. The “N” indicates which navigation system is in use; “N” denotes GNSS (eg, multiple satellite constellations are being used). “P” = GPS only, “L” = GLONASS only, “A” = Galileo only. This should never change as it is based upon your hardware capability – the official wardriver builds use GNSS chips so this should always show “N”. “GSM pos OK” means your location was determined using Cell Tower Positioning (GSM location)
The third line contains the number of BLE devices in range along with how many GSM towers are in range.
The fourth line contains the current date/time of your wardriver in UTC. If this date is incorrect, it generally indicates that time sync on boot was unsuccessful (likely due to no configured network being in range on boot) and that your GPS chip is not yet reporting time information which happens when it has not yet locked.
Your LCD may at times state “No GPS” indicating that your device does not currently have a valid GPS signal. The LCD will also indicate “GSM pos OK” or “No GSM pos” indicating if your location has been determined using the GSM cell towers or not. GSM positioning requires additional files to be placed onto your SD card during setup - These files are not yet available to the general public so your wardriver will always indicate “No GSM pos”.


